DOBOT MOOZ 1 MANUAL
1) Assembly
1.1.1 Install the Filament Support
Fix the Filament support on the Z-axis with screws (M3 screw x2).
As shown below.

1.1.2 Install the Heated Bed and Wifi Antenna
Align the heated bed to the platform, run the black cable through hole on the platform, embed the round magnets into the ledges and connect the cable to the socket. Screw the Wifi antenna on the base clockwisely.
As Shown below.

1.1.3 Connect the Cables
Before power on the machine, please follow the chart below and connect all modules to the main control boar correctly.

2) Operation Panel
2.1 Home Page

2.2 3-Point Leveling Interface

2.3 File Directory Interface

2.4 Control Tools Interface

2.5 3D Print Functional Module Control Interface

2.6 Laser Engraving Functional Module Control Interface

2.7 CNC Carving Functional Module Control Interface

2.8 Zero Point Setting Interface

2.9 X/Y/Z Motion Control Interface

2.10 Other Settings Interface

2.11 Working Process Control Interface

3) 3D Printing
3.1 Install/Remove the filament


3.2 Set the Zero Point


3.3 3-Point Leveling
Please follow the guide of the machine to record three different points to define a plane parrallel to the heated bed, these three points must be recorded in order with nozzle in the areas shown in the drawing below, one in each. The callibration requires to be set only for the first use.


3.4 Obtain Gcode Files


3.5 Use the Slicing Software
Description: MOOZ supports most third-party printing softwares, such as Cura, Repetier-Host, etc. Cura 3.1.0 is described here as an example.
3.5.1 Install the Slicing Software

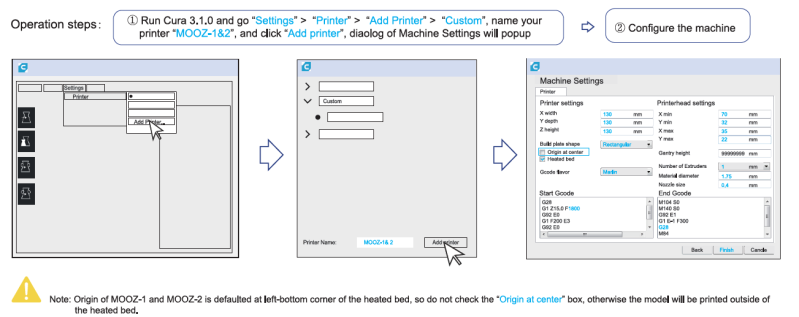
3.5.2 Configuration for Initial Use
3.5.3 Online Printing


3.5.4 Offline Printing

3.6 Printing Control

Maak jouw eigen website met JouwWeb